1990 Canadian Sailcraft CS34 Shoal Draft
Sail #8268

1982 Catalina 22 Fin Keel
Sail #10506

1994 MUMM 36 ACE
Sail # 29206

Sunday, March 31, 2013

C22 Bottom Paint

Got to the club at 10am as it was supposed to rain in the afternoon.

First started taping the off the stripes:


I had missed an entire section with the power washer last fall, so had to head to the clubhouse to get a bucket of warm water to wash it.  Also dropped diagonal opposite pads, cleaned and painted underneath (two coats).


Also painted the rudder:


In the end I did three coats:


Saturday, March 30, 2013

CS34 Instrument Thru Hulls and Bottom Paint

On good Friday, I had rough fitted the through hulls.

The log transducer was sticking up slightly causing the floor boards to raise.
I took the time to remove the old backing plates.  They were 1/4" plywood and were rotted.  Used a 3 1/2" hole saw to remove the plywood cleanly.  The fiberglass on the hull is over about 3/4" thick!

I made up two backing plates using 1/4" lexan I had around the house.

Also removed all of the sealant around the outside of the through hulls.  Use a random orbit sander to smooth it out.  The epoxy barrier coat was done right with alternating layers of white and grey.

Dry fit before sealant

I changed the log and depth transducers around and it solved the clearance problems.

Also taped the outside of the hull to prevent the sealant from going on the hull.

Buttered the bottom flanges of the instruments with Sikaflex 291 LOT, as well as around the inside before putting the backer plates down, and tightening the nuts.

Took the excess sealant off with a putty knife, then took the tape off.  Great JOB!

Rita washed the hull of the boat below the waterline, while I mixed up one can of VC-17.  We alternated painting the bottom.  It took us about 3 hours.  Looks great!

Tomorrow I will do the little boat's bottom.


Tuesday, March 26, 2013

C22 Bahamas Bound!

Got my insurance papers in the mail today for the Catalina 22.

I can now take the little boat to the Bahamas!

Click for larger version
Thanks State Farm!

Sunday, March 24, 2013

CS34 Drill Through Hulls

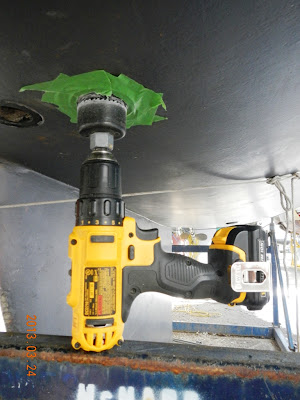
My Craftsman drill would not fit between the hull and the cradle, so I borrowed a smaller Dewalt.
 
Made up a wooden plug with a smaller holesaw put it in the existing 1 5/8" hole:


Plug made of aspenite
Started the drill backwards so as not to chip the gelcoat


Pretty easy really!

Thursday, March 21, 2013

C22 Tiller and Tiller Extension

Picked up a new tiller at West Marine today.

Thing of beauty:


Neil from Newcastle with Santeria gave me his old tiller extender.

With the longer tiller and extension, we will be better able to move our weight forward when healed over or going downwind.

Saturday, March 16, 2013

CS34 NAVPOD mockup


Positioned the angle guard and NAVPOD to see how they would look:


Final position will be a couple of inches lower.

Looks great!

Friday, March 15, 2013

CS34 View from Helm

Here is a picture from last year looking forward:


The three instrument displays are the old Silva units:
  • Top does depth and speed
  • Middle does wind speed and direction (not working)
  • Bottom is a close hauled wind display
This cluster will be replaced by a Raymarine i70

I have the dodger canvas in for new zippers and window material.  It was difficult to see past the faded windows.


Wednesday, March 13, 2013

CS34 Angle Guard

Angle or Angel guard?

Ordered an angle guard to replace the one on the binnacle to accommodate the used NAVPOD I picked up next year off Kijiji:


The bent stainless pipe will support the NAVPOD above the binnacle compass and present the chart plotter, instrument display(s), and in the future autopilot controller above the wheel.  Will also allow us to use our existing teak cockpit table.  Will also give a good handhold in the cockpit.

Next steps:
  1. order black plexiglass to cover the existing holes
  2. cut the guard to fit on the binnacle
  3. drill holes to accommodate wiring
  4. fish wires for E7, i70, p70, and remote RAM mike
  5. mount the instruments
  6. mount the remote RAM mike

Tuesday, March 12, 2013

CS34 Removing Bulkhead Instrument Displays

Decided to remove the cluster of three Silva Nexus instruments from the cockpit bulkhead.
These are being replaced by a single Raymarine i70 instrument I got from the boat show.

The wind system stopped working last year, and I found out why.  The wiring connector is held on the terminals using a round plastic piece that screws onto the back of the instrument:

The connector was disconnected from the display

The top instrument displays depth and speed, and worked fine.  It daisy chains using the Silva RS485 bus to the 2nd one down, the wind instrument.


The plastic holding the wiring connector was broken!

The amount of trouble I went though last year thinking it was the wind transducer that was fubared!  I should have checked the bulkhead instrument displays.

Oh well, these 23 year old instruments needed to be replaced.  Having the latest and greatest wind/speed/depth transducers interfaced with two i70 displays and an e7 chart plotter will be nice.


CS34 Salon Lights

The two salon reading lights are original, tarnished, cracked, and have had much of the brass coating rubbed off.

I had picked up replacements at the boat show:


The new ones will fit and look great!

CS34 PULL Those Through Hulls

Went to boat with channel lock pliers to spin the through hulls to break the seal and hopefully pound them out with a block of wood and hammer.  The through hulls spun no problem, but I could not get them out.

I texted Brian Brennan from Newcastle and he came by with his home made puller.  Took about 15 minutes to remove BOTH of them.

Spinning the through hulls


Here you can see the threaded rod and block of the puller

That was Easy!
View from outside of the hull

Things are much easier when you have the proper tools!

Sunday, March 10, 2013

CS34 Salon Table Removed

I have to have both boats ready to go into the water before we leave for Holland on April 16th, as we return the day before launch.

On the big boat, that means
  • replacing the through hull transducers
  • bottom paint (VC17)
  • de-winterizing the engine
  • taking the cover off
On the little boat, that means
  • bottom paint (VC17)
  • taking the shrink wrap off
  • mounting the rudder & tiller
  • mounting the motor
  • replace jib tracks (easier on the hard)
Sunny and 10 degrees Celcius, down to the boat!

Lifted the floor boards and removed the salon table to gain easy access to the through hulls


Took the time to remove all the cabling for the depth and speed tranducer, as well as the old Silva server that they all connect to:

 Silva Instrument Server

Close up of the instrument through hulls

Pounded on the through hulls, but they would not budge.

I will have to replace the VHF and TV antenna wires are they looked very rough.

Went over to the little boat and removed the jib tracks; took a couple of hours.  The butyl tape bedding from 2009 worked perfectly!